Strawbale Building
It is important to note at the outset that straw is not the same thing as hay – this is a common misconception for town folk, lol. Hay contains grass seeds and will attract all kinds of critters looking for a ready food supply. Straw, properly harvested and baled, contains minimal seed and can be sourced as a by-product, often a waste product, from many grain crops for example rice, barely, wheat etc... Straw is an ideal medium for building bale walls in most climates (except the tropics and sub-tropics), hay is ideal for feeding to hungry animals.
Another common misconception, perpetuated by the three pigs story (brick sales propaganda in disguise), is that a straw building is inherently weak and will blow away, rot, burn or otherwise self-destruct and is a lazy and stupid choice of building materials. In fact a properly built and maintained strawbale building will; last at least as long, if not longer than ‘modern’ building materials; is not subject to rotting or decay (unless poorly built) and can be used for construction of load bearing walls in multi-storey buildings (even under snow loading); is an excellent natural insulator for sound and heat with R ratings far higher than ‘modern’ insulated walls; and last but not least plastered strawbale walls are actually fire-resistant as proven in US forest and Australian bush fires. If you need another opinion to overcome 3 pig indoctrination Here’s a link to an Engineer giving his perspective on building with straw bales - whoever created the wolf and 3 pigs story has a lot to answer for!
“Modern era" Strawbale house building dates back to the early settlement of the United States from Europe and the invention of horse powered baling machines in the mid 1800’s.
Across the US midwest, and in Nebraska in particular, with little timber available in a sea of prairie grass, materials for traditional timber and brick house buildings were in short supply, so the use of baled straw from food crops for constructing houses was a practical solution for the settlers.
These strawbale buildings were often built with load bearing strawbale walls, in snow country… several were multi-storey and many of these buildings are still in use today.
In the 1970’s and 1980’s interest in eco building techniques liked rammed earth, adobe and strawbale grew and new building types like earthship’s were developed using a mix of old and new techniques and materials. The early adopters were often hippies wanting to escape the suburbs and build their own dwellings, and while most were well built, they often did not seek/have building code compliance. This was a time of experimentation and learning that supported later efforts to standardise and codify best practices for eco-building materials and construction methods.
In the 1980’s and 90’s awareness of the ecological, aesthetic and practical advantages of strawbale building grew, and licensed builders and structural engineers started the process of testing and codifying standards for strawbale construction. These standard methods covered the construction of load bearing straw walls and non-load bearing straw walls (in-fill). In practice most strawbale dwellings constructed from the 90’s onwards were post and beam in-fill type, as this method provides the primary benefits of strawbale building, while being simple to construct and most importantly with a lower perceived risk for the planning authorities to provide building consent.


495 Kahuraniki Road
As the materials and building methods started to gain planning authority approval, Architects were commissioned to design straw bale homes. The first architecturally designed strawbale house built in New Zealand was 495 Kahuraniki Road in Hawke’s Bay, designed by the late Steve McGavock of Te Awanga. It has a beautiful butterfly roof, massive walls and timber beams framing sweeping views along the Tuki Tuki river valley. This house has inspired at least two straw bale house builds that I know of (ours being one) and I suspect many, many more…
Many strawbale houses have now been consented as accepted alternative solutions to local building codes all over the world. Strawbale homes feature on TV, for example in Grand Designs UK and Grand Designs NZ, and there are DIY workshops and specialist architects and builders. While Strawbale building has been steadily edging towards mainstream building in the 2000’s the numbers of strawbale homes built per annum still remains very small in the overall scope of new homes built – so strawbale still remains an unusual and often architect designed alternative to choosing a standard home package.

Nga Kereru’s strawbale walls are built using timber frame ‘bucks’ with strawbale infill.
The walls are topped with a perimeter plywood/timber box beam.
The house has external and internal strawbale walls which are plastered with a clay finish inside and clay/lime outside.
In addition to its natural beauty the plaster system is a great insulator for heat/sound, it is airtight but allows vapour to move in/out of the walls and last but not least it also adds to the thermal mass of the house.
Finally, the question you have probably been pondering all along.. is building with straw bales cheap?
The answer depends on many variables, as a building material yes, it is – in fact straw is burnt annually as a cropping waste product in many countries, but... baling straw and plastering it takes time and considerable effort... so if your labour is free then it’s cheap. From an economic viewpoint labour is never free, there is always at least an opportunity cost of what you could have been doing productively in the same time. From the viewpoint of an owner builder labour can be free and the time committed to building a joy rather than toil... so it all depends on how you look at it. If you choose to employ someone else to build your strawbale house, you can expect the construction costs to be comparable with an equivalent sized timber frame house. If you engage an Architect and want your own vision realised then there will probably also be consulting engineers involved and the costs do mount up quickly – but this is true of any custom build house project.
As noted at the start there are many variables… our advice is to make a realistic budget based on your choices as early in the process as possible, keep refining it as your choices change and do get informed second opinions as you go.
Interested?? here are some links/references/people that we found helpful.
For general information and how to guides (USA) for strawbale building, see the following books and on-line resources:
The Straw Bale House; Athena Swentzell Steen, Bill Steen, David Bainbridge, David Eisenberg - Real Goods Independent Living
Design of Strawbale Buildings: The State of the Art; Bruce King – Green Building Press
www.strawbale.com; Andrew Morrison – StrawBale Innovations
For more information about Strawbale building in New Zealand, contact:
Earth Building Association of New Zealand
If you are ready to design and build your own strawbale house in New Zealand, contact;

Pat Mawson and Nils Rock from RM Strawbale in Hawkes Bay

Alex Greig and the team at GreenHaus Architects
In today’s connected world Google and YouTube also provide a wealth of information about building with straw bales.
Things were a little different 25 years ago, when the three pigs had a lot more airtime than the strawbale builders…
Have fun exploring!
Passive Solar Design
Passive solar design is based on the principle that there is a non-polluting, always on, nuclear reactor in the sky flooding planet earth with free energy year-round, and that ignoring this fact during house design leads to unhealthy, expensive to operate buildings. We should simply build for the sun that sustains all life on earth.
A passive solar house basically lets the sun do the work (that’s the passive bit), by orientating the building towards the sun and storing energy captured from the sun for winter heating, and then avoiding unwanted energy capture from the sun in summer using unheated thermal mass and ventilation for cooling.
Passive solar design is a big subject and, like the other sections in this site on strawbale building and eco-system design, we will just touch on it lightly here highlighting some key elements that we are employing for Nga Kereru. If you are interested in learning more about passive solar design an internet search is a great place to start, as there is a huge body of knowledge on-line.
Siting the house
In the southern hemisphere the Sun tracks across the northern sky, so for maximum passive solar efficiency the house should be orientated to face true north (map North, not magnetic North) and the winter sun exposure should be as uninterrupted as possible. Our building site at Nga Kereru ticks all these boxes.
Managing heat gain
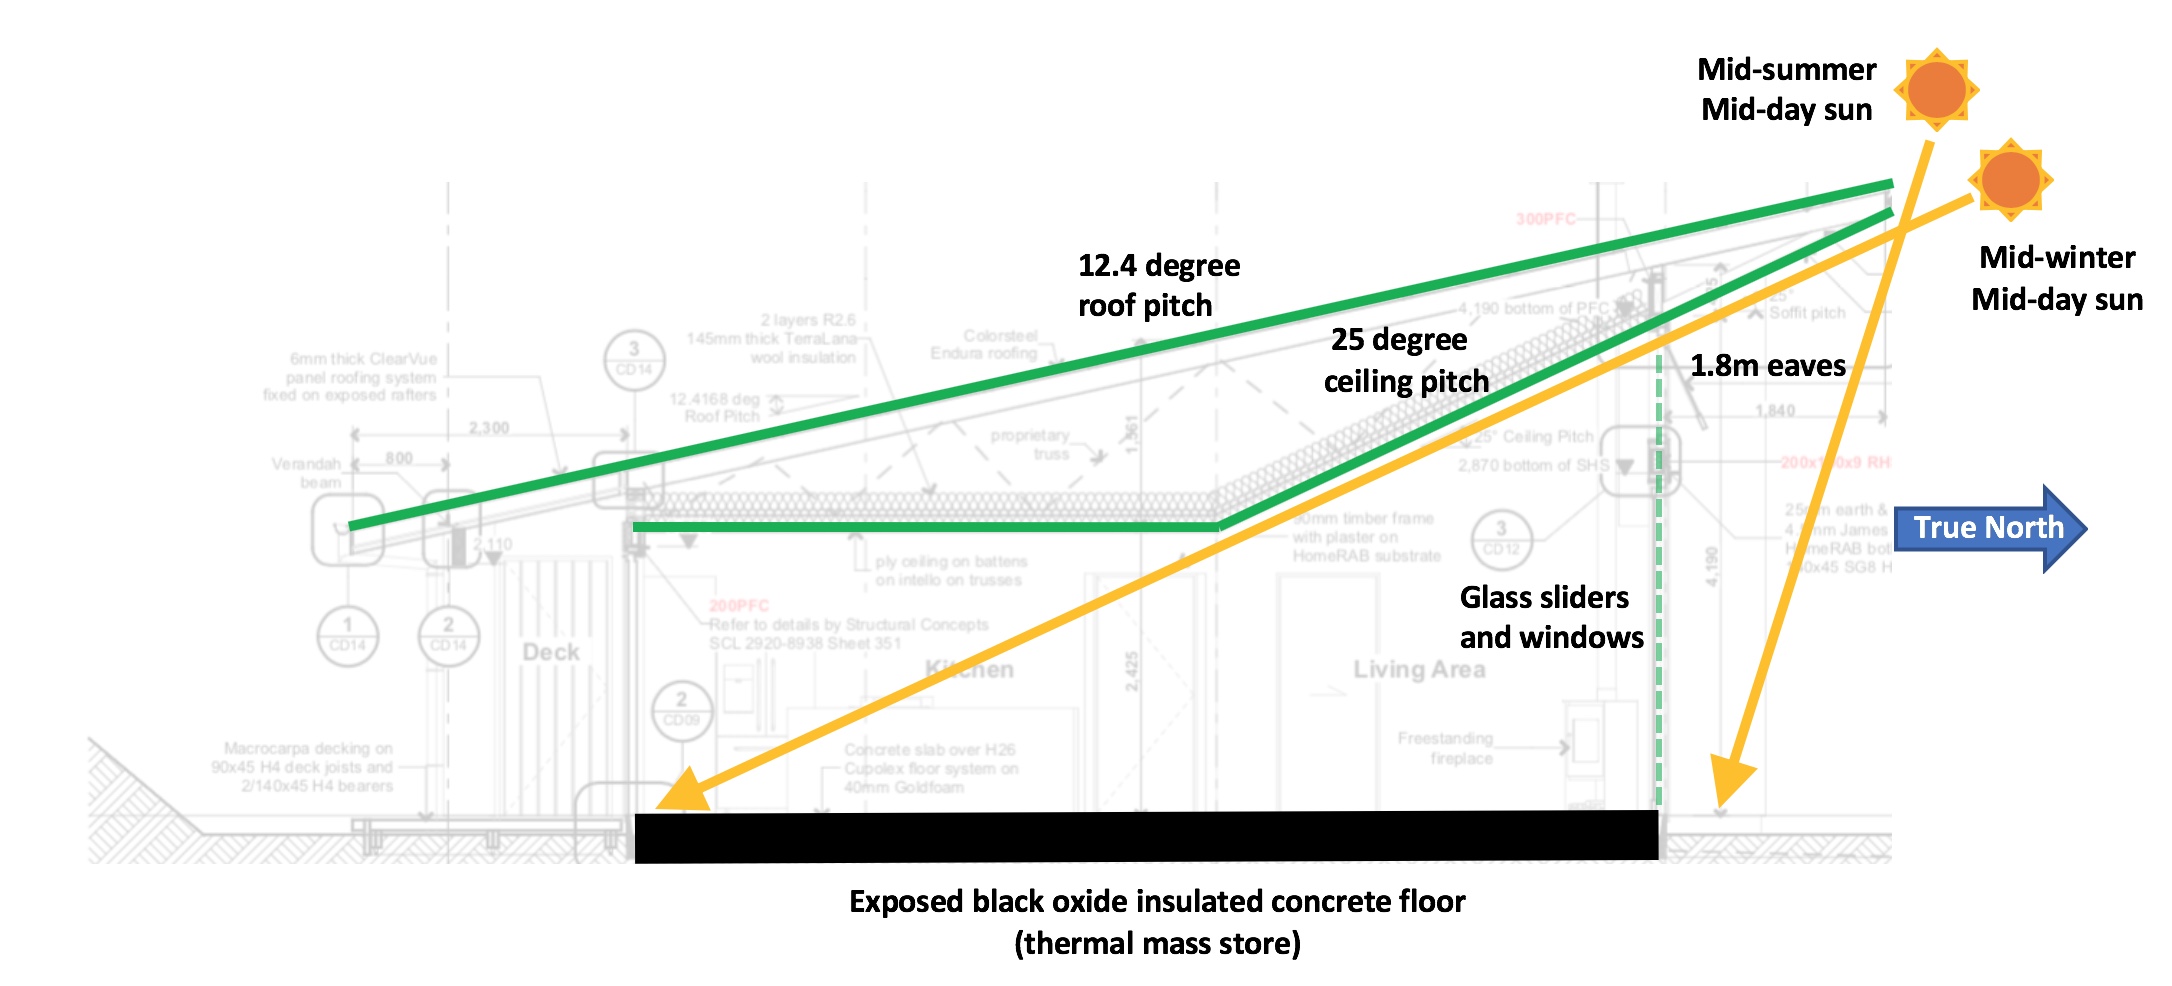
The sun naturally changes its inclination as it tracks across the sky through the seasons, tracking low in the sky in winter and tracking more overhead in mid-summer. Nature allows us to design the roof, ceiling and eaves of the house to maximise heat gain from the sun in winter and minimise heat gain from the sun in summer.
Our house design has broad eaves that help protect the plastered walls from weather and also to control the amount of sunlight entering on the northern face of the house. The ceiling pitch is set to 25 degrees on the north side of the house to allow penetration of the sun to the back of the house in mid-winter, directly heating the entire open plan living area and two of the bedrooms, as shown in the diagram below.
Thermal mass
Thermal mass refers to materials that can retain heat and discharge it gradually. Stone, concrete and water are all good examples of materials that can be used for heat capture and storage.
Our house has a super insulated black concrete slab floor. The floor is polished to a salt and pepper finish and left exposed so it can absorb or radiate heat most efficiently. The walls are clay plastered inside and clay/lime plastered outside, with the internal plaster making a significant contribution to the thermal mass of the house.
This heat storage and transfer from the thermal mass within the house is used for warming or cooling the surrounding air depending on the season, regulating the air temperature within our house year-round within a couple of degrees range (21 - 23 degrees celsius) without any other energy inputs.
Thermal efficiency
The siting of our house for the sun and building in thermal mass are a great start, but without insulation and airtightness the thermal gains are offset by losses that require additional energy inputs. We have therefore given special attention to maintaining the integrity of the thermal envelope of our living space.
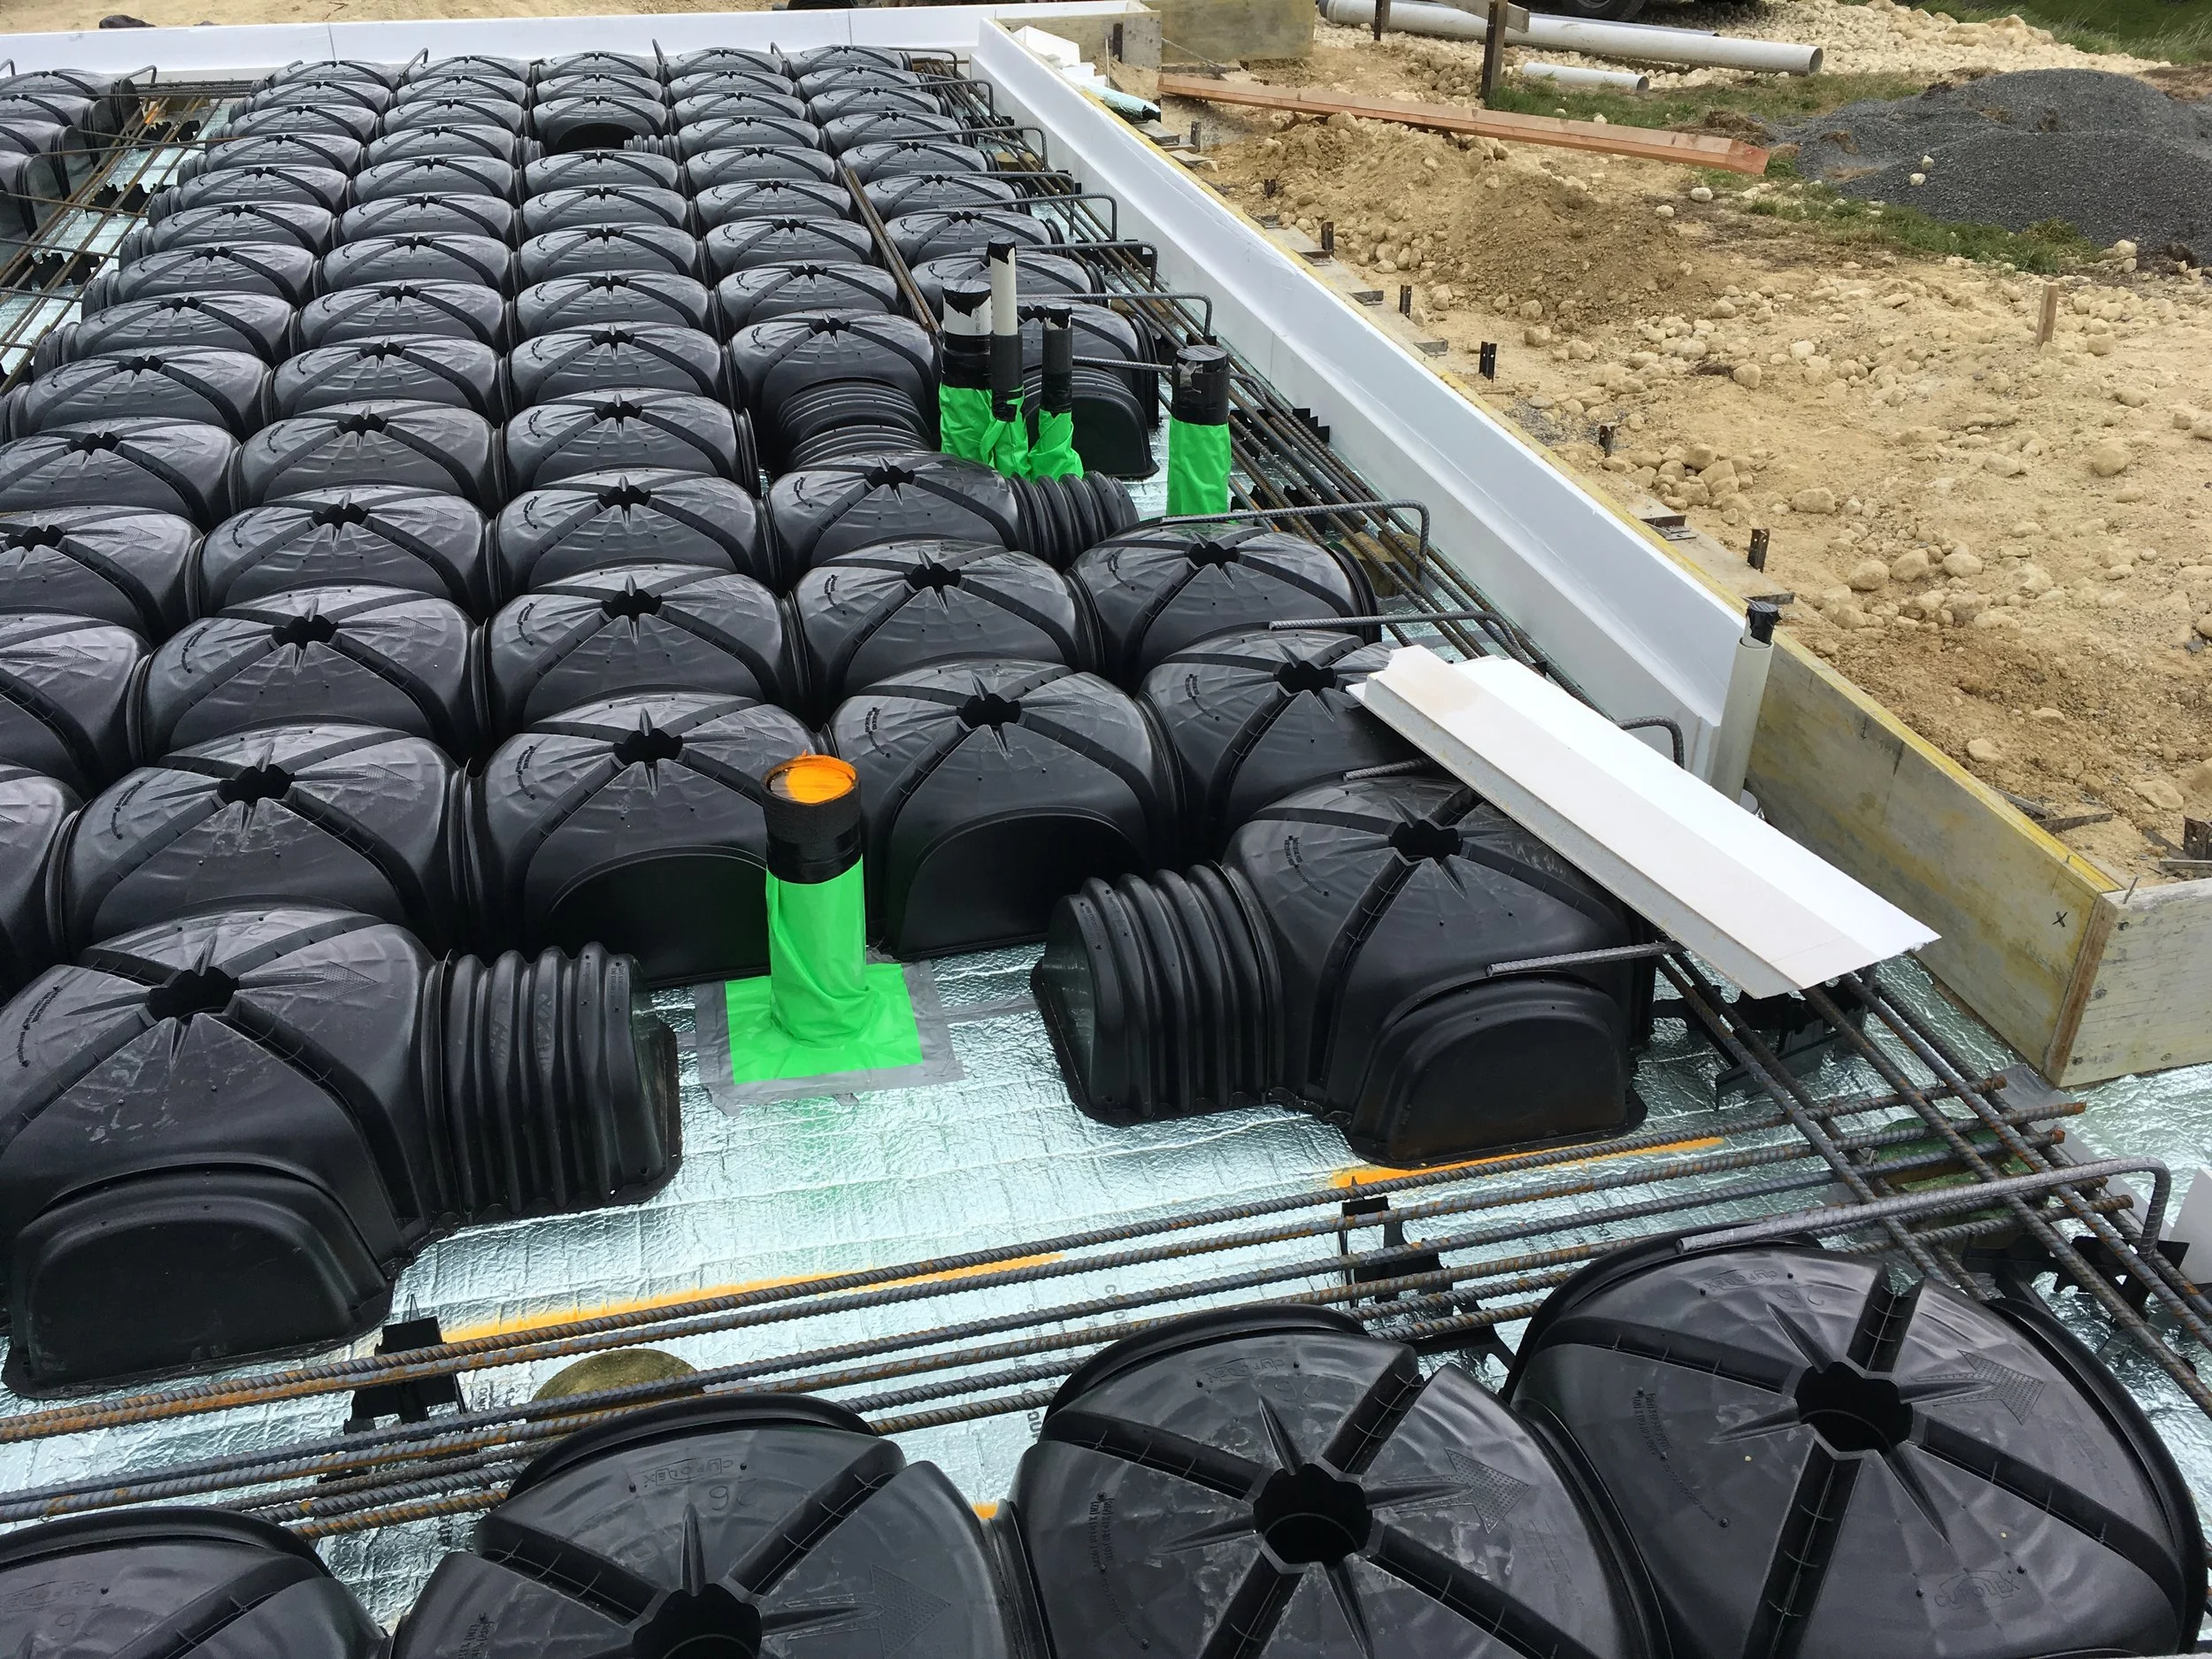
Super insulated floor slab (before mesh)
The concrete slab is the primary thermal mass storage so it has been fully insulated, using Cuploex Thermal Wrap, Cupolex Pods and Magrock Insulfound.
The Cupolex Thermal Wrap and Pods are insulated from the ground and provide for heat transfer within the slab, and the Magrock Insulfound insulates the perimeter of the slab from ground and air heat gains/losses.
80% of the heat loss in a slab is to the air from the exposed sides of the concrete slab if uninsulated.

All timber Naturline 90 window with external reveal
In our frame walls 1 layer and in the ceiling 2 layers of TeraLana R.4 wool insulation are being installed over a Pro Clima Intello airtightness membrane for the living spaces.
The weak point in passive solar homes, for thermal efficiency, is generally the extensive north facing (in the southern hemisphere) glazing that is required. To minimise unwanted heat loss in winter, we have specified Natureline European profile all timber hardwood exterior joinery from ThermaDura of Mosgiel.
Thermal bridging through the frames is eliminated by the all timber construction, and the glass is 52mm double glazed, low-E and argon gas filled throughout.
Nga Kereru ongoing energy requirements
Most importantly our house is designed to passive solar principles and super insulated, and so has minimal energy requirements for climate control as it does not require additional energy inputs for seasonal air conditioning to heat or cool. As designed our house should maintain a 21-23 degrees celsius temperature range year-round - we will update with our actual experience here after a couple of years living in it :-)
Our house has also been designed for low total energy consumption, with induction cooking hobs, a heat-pump hot water system, a high efficiency wood stove for backup heating (if required) and LED lighting throughout.
The house has been connected to the Grid for its energy supply but has been built ready for future solar power generation. Why?
The grid in New Zealand is currently 85% renewable power and with a small population to fund renewable power generation and power distribution connecting to and using power from the grid is generally the greenest, most socially responsible option in New Zealand.
As the grid is predominantly renewable power in New Zealand the solar power rebates available in other countries e.g. Australia and USA are not offered here, and grid connected solar energy buyback rates in New Zealand do not incentivise householders to use the grid as a virtual battery.
With steadily falling prices from improved design and economies of scale as demand has increased, Photo Voltaic (PV) panels are now competitively priced for power generation in New Zealand without subsidies, however to be effective they need to be used in conjunction with batteries to supply continuous power when the sun is not shining. The cost of batteries, like PV cells, has reduced dramatically over the last decade – by an order of magnitude in fact, however… they still have some way to go before they are competitive without incentives in New Zealand vs grid-based power. Within the next 5 to 10 years we expect it will make economic and ecological sense to invest in PV solar and batteries for on-site power generation and storage at Nga Kereru.
We have connected to the grid at the front gate with a new transformer installed, and we then trenched and cabled the power underground approx. 150m uphill to the building site. We have three phase power connected to the house, setup for three phase 400v charging of two electric cars and also have cable laid for a future PV solar panel array on the North facing hillside directly behind the house.
Passive House
Passive house design has been developed in Europe, originating in Germany, and building standards have been developed there to certify building practitioners, materials, designs and finished buildings.
Passive house is not the same as passive solar, passive house is a design philosophy principally concerned with the comfort of the occupants which pays particular attention to the integrity of a buildings thermal envelope - air-tightness and ventilation management are the key aspects it addresses.
Thanks to our builders and architects knowledge and input we are applying many Passive Haus principles in the design and build of Nga Kereru, but we are not actively seeking Passive Haus certification.
We are using several specialised products, primarily sourced from Pro-Clima NZ, to wrap and tape for air-tightness of the houses thermal envelope during construction.
Ecosystem Design
Where are we?
We are choosing to live out of town in a very special area, near the head of the Maraetotara river valley in Hawke’s Bay, New Zealand at approx. 350m above sea level.
The valley is within the cape to city native bird corridor and is only a few minutes from Waimarama Beach. There are many beautiful limestone outcrops and several native bush remnants and conservation area’s, it is also farming country with deer, cattle, sheep and goats all farmed in the valley.
Regenerating native bush from pasture
The planting of Nga Kereru is for our family, friends and the local wildlife to enjoy while we are custodians of this land and for the benefit of future generations.
We started planning for the planting immediately after purchase of the land in 2016, with site specific advice sought from Ewan MacGregor (Hawke’s Bay Regional Council – native forest regeneration), Marie Taylor (Plant Hawke’s Bay – native plant nursery) and Anna Archibald (local planting services). It was too late for us to order the seedlings needed for the 2016 planting season, so we focused on ordering our plants in 2016 to start planting in the 2017 season.
If you have a significant area to plant that is clear of your future building site, our advice regarding planting is to do it before rather than after building. We feel it should be prioritised as one of the first investments rather than an afterthought to be funded with whatever time and money is left over from the house build, this is most often nothing...
The initial Nga Kereru planting programme spanned three years 2017 - 2019 to re-establish native forest on what was pasture and setup orchard and garden areas for food production. Two thousand, five hundred native trees and shrubs have been planted in these three seasons. Season three completed the initial native planting programme and established the orchards and gardens. In subsequent years we will add additional native species, for the forest understory and ground cover, that require the shade of the canopy that has been established by the initial three-year planting programme.

We are using seedlings from Plant Hawke’s Bay of local species/varieties sourced from locally collected seed stock.
This ensures that the planting is truly local native.. and will integrate with existing native forest remnant’s and conservation forest reserves in the Maraetotara valley.
Season one planting was completed by Anna Archibald and her team, with an excellent 99% strike rate, but unfortunately she was unable to continue working with us for season’s two and three – we thank her very much for her contribution.

Guy Morris from GB Landscapes has taken over our planting.
He and his team did an excellent job in 2018 and 2019, and with his permaculture background has supported us with both native planting and our orchard/vegetable planting.
The Maraetotara valley is populated, like much of New Zealand’s grazing land, with many Rabbits and Hares. Some of the Hares are the size of dogs (no kidding), they don’t like surprises and so want to have an un-interrupted view – any new plantings are therefore likely to be sniped off at ground level by the hares if unprotected.

2017 plantings in 2018
We have used bamboo staked combi-guards around each plant, in combination with weed mats to give the seedlings a chance as the property is no longer grazed and they have to compete with aggressive grass, tussock and weed regrowth.
We are tackling variegated thistles and other weeds with the grubber and scrub bar and are doing releasing after each planting to make sure our seedlings are not swallowed by pasture and weed regrowth before they have a chance to get established.

Before and After highlighted at our boundary
We have not needed to use irrigation yet, although it is available if required in a severe drought. In re-establishing native forest at Nga Kereru we are intervening as little as possible to encourage survival of plants suited to this location and deep rooting of the trees as we are in a high wind zone. Nga Kereru has great topsoil and free drainage and with good planting seasons in 2017, 2018 and 2019 the strike rates have been excellent. Any damage that has arisen is from rapid growth followed by strong winds breaking the saplings, and we have found these tend to recover naturally with new growth if left to their own devices.
Orchards and Gardens
Our goal is to be as self-sufficient as possible with fruit and vegetable production at Nga Kereru. Seasonal food is being preserved for off season enjoyment and sharing with friends and family – regular food swaps with our neighbours increase the diversity of our food supply, but we also welcome dining in tune with the local seasons rather than sourcing foodstuffs out of season through global supply chains.
As noted above the 2019 planting season (July-Aug) established our orchards for food supply and in spring 2019 and summer 2020 the vegetable and herb gardens are being established in their final site.
Our orchards are situated on the west facing slopes of our two main gullies, which are relatively frost free, enjoy passive irrigation from stormwater water runoff and have some shelter from the prevailing winds. Both gullies run to the north and receive plenty of sun. The first gully has been planted with fruit trees and the second gully primarily with nuts. The second gully is also the location of the waste system discharge field with a steady supply of nitrogen laden grey water to this area. Our orchard planting is spaced and complimentary, rather than in orderly rows of single species with permaculture principles actively applied to minimise toxic inputs.
In addition to our gully orchards, a small grove of olive trees has been planted on the North Face of our property to take maximum advantage of the sites solar gain, and we have also planted a small number of citrus trees (lemons, limes and mandarins), feijoa’s and table grapes in close proximity to the house for ease of access to them.
Our vegetable gardens were established initially in the spring of 2018 using raised beds and planters situated near the caravan site during the house build phase – so we could learn from experience what works and what doesn’t in our micro climate.
The 2019/2020 and onwards.. (post house building) location of the vegetable and herb garden beds is in the south eastern corner of the property, which had a big mound of top soil from the building site on top of it during the build. This location has great all-day sun, easy access from the house site, an established water supply, great natural drainage, has now been levelled with fill from the building site and has the beautiful black top soil of Nga Kereru restored on top.
With local rabbits, hares and birds in abundance the gardens require protection, so a combination of fine fibre mesh and chicken wire is being used to enclose all of the garden beds.
Frosts and snow (once every couple of years) are also an issue at 350m above sea level so varieties that can handle the local climate have been chosen, as well as employing frost mitigation strategies for some orchard and garden plantings.
We have planned siting a bee hive in one of the orchard gullies to support orchard and native tree pollination, with a spin-off benefit of supplying Nga Kereru with fresh comb and honey, but our neighbour already has several hives and thee should take care of our pollination needs for the immediate future.
Water
Our water supply is a combination of potable spring water and rainwater from roof collection.
The spring water reticulation was trenched and plumbed in at the same time that the 30,000-litre rainwater tank was sited and the NaturalFlow NF8000 waste system was installed in early 2017. The spring water supply can top up the rainwater tank during droughts and has irrigation lines with risers and taps spread across the property.
Spring water is being used for irrigation (all our outside taps) and for drinking water - it’s wonderful to drink as it’s naturally alkaline. Rainwater is used to supply the hot water heating system, and so is used for cooking, and in particular showering and bathing as it is naturally more acidic which is excellent for the skin.
Manifolds are setup at both the rainwater tank pump shed and at the house, so our water supply can be switched across in the event of issues with either the rainwater or spring water supply. For example, the rainwater supply to our house for hot water is normally dependent on a pump, but if we have a power outage the spring water, which has great pressure from its gravity supply head far above the property, can be switched over to supply all of our water needs at mains pressure until power is restored.

Rainwater from the house roof flows through an incoming maelstrom filter system into our 30,000 litre rainwater tank and is pumped back up to the house at mains pressure.
We have chosen to build a dry stormwater system, meaning that the downpipes and stormwater pipes through to the tank empty out, by gravity, after each rain event, rather than a wet system where water sits in the pipes. There are pro’s and con’s of wet and of dry plumbing for rainwater harvesting, it pays to research on the net and talk to people early on and then chose the one which works best for your circumstances, its a foundational decision.
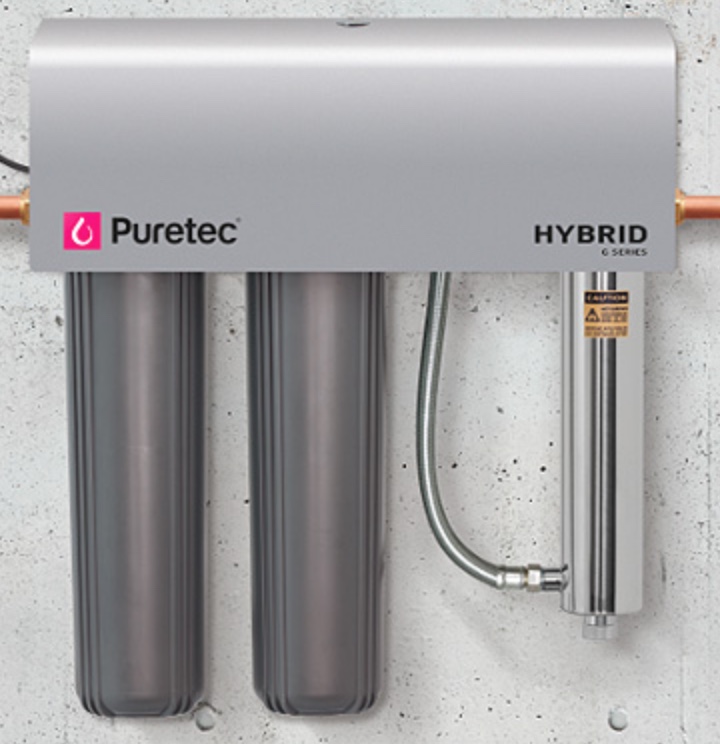
A supply side Puretech G9 filtration system is setup at our rainwater tank, with passive and active elements – the passive elements being a pair of large cartridge filters and the active system being ultraviolet light treatment. This is focused on the rainwater side of the water system as it is more likely to become contaminated due to organic matter, but if spring water is directed into the water tank or diverted back to the house from the pump shed through manifold switching it will also pass through the supply side filtration system.
Our stormwater overflow is piped across the contour from our rainwater tank into our stormwater gully, which has engineered culverts and drains directing the stormwater to a ponding area below Nga Kereru.

Wastewater is treated through our NaturalFlow NF8000 system.
This system is entirely gravity fed and uses worms (vermiculture) to process our black water and solids before discharging along with the grey water into the dosing field in the orchard. All toilets are standard flush type and as the worms love most things organic an insinkerator could be used in the kitchen – however our preference is to compost our kitchen waste and/or feed it to the chickens.