Blog 31: Cob Oven
The answer to the question Pizza Oven? is Yes! we are building a cob pizza oven!

back of a napkin outside bathroom design
We also have a plan, and have begun collecting what we need, for an outside bathroom.
We have already acquired (at no cost, but quite a lot of sweat) a cast iron bath thats in really good nick and have a plan agreed with Kenny our plumber for hooking it, and the outside shower, up to the house hotwater plumbing so it will be easy to use and therefore get more regular use.
But the current star of the show is the Pizza oven, so rather than wait until the oven is completed and fired up, here is part one of the build story including a brief step by step of our experience to-date for those who like such things...
A disclaimer though first, you will need more than this blog post to actually build a cob oven, it should give you a good feel for whats involved but not the detailed instructions you would need. Pat our builder, having built several cob Pizza ovens, has guided us through the process lending a hand at key points. He also loaned us a great book called “Building with Cob - a step by step guide” https://www.amazon.com/Building-Cob-Step-Step-Sustainable/dp/1903998727, it has a whole section on building a cob outdoor oven that we are following as we go. Note, there is no concrete (other than rubble for filling the base) used in our oven build, it is cob - our recommendation is to at least buy the book before attempting to build a cob oven as there are important ratios, tips and tricks.. that you will need to know.
Step 1: Site the oven
We have sited the oven out of the prevailing wind, close to our entertaining area and not obstructing light or blocking views from the south facing house windows. For aesthetics we also wanted to avoid having everything parallel, so we took a piece of rope and standing at the sliding door entry to the deck we traced a semi-circle and used this to locate the future pizza oven, benchtop and BBQ in an arc off the eastern side of our rear deck.
Step 2: Decide on the size

First attempt sagged, maybe a little to much internal volume..
We went big with 900mm internal diameter and 1500mm external dimateter, at least initially... The base for our oven is 1500mm, but our first attempt at that 900mm internal for the oven itself collapsed during construction.
All part of the experience, we were experimenting with builders mix instead of sand with clay for the firebox and our mix didn’t quite hold and the internal size - pushing the volume limits...
All was not lost, just some time chalked up to learning, as we recycled the materials back into building a smaller (still relatively large) diameter oven at 800mm internal.
Step 3: Prepare the foundations
The oven and base combined are quite heavy, so it needs its feet firmly planted or it will subside and maybe even tip over…
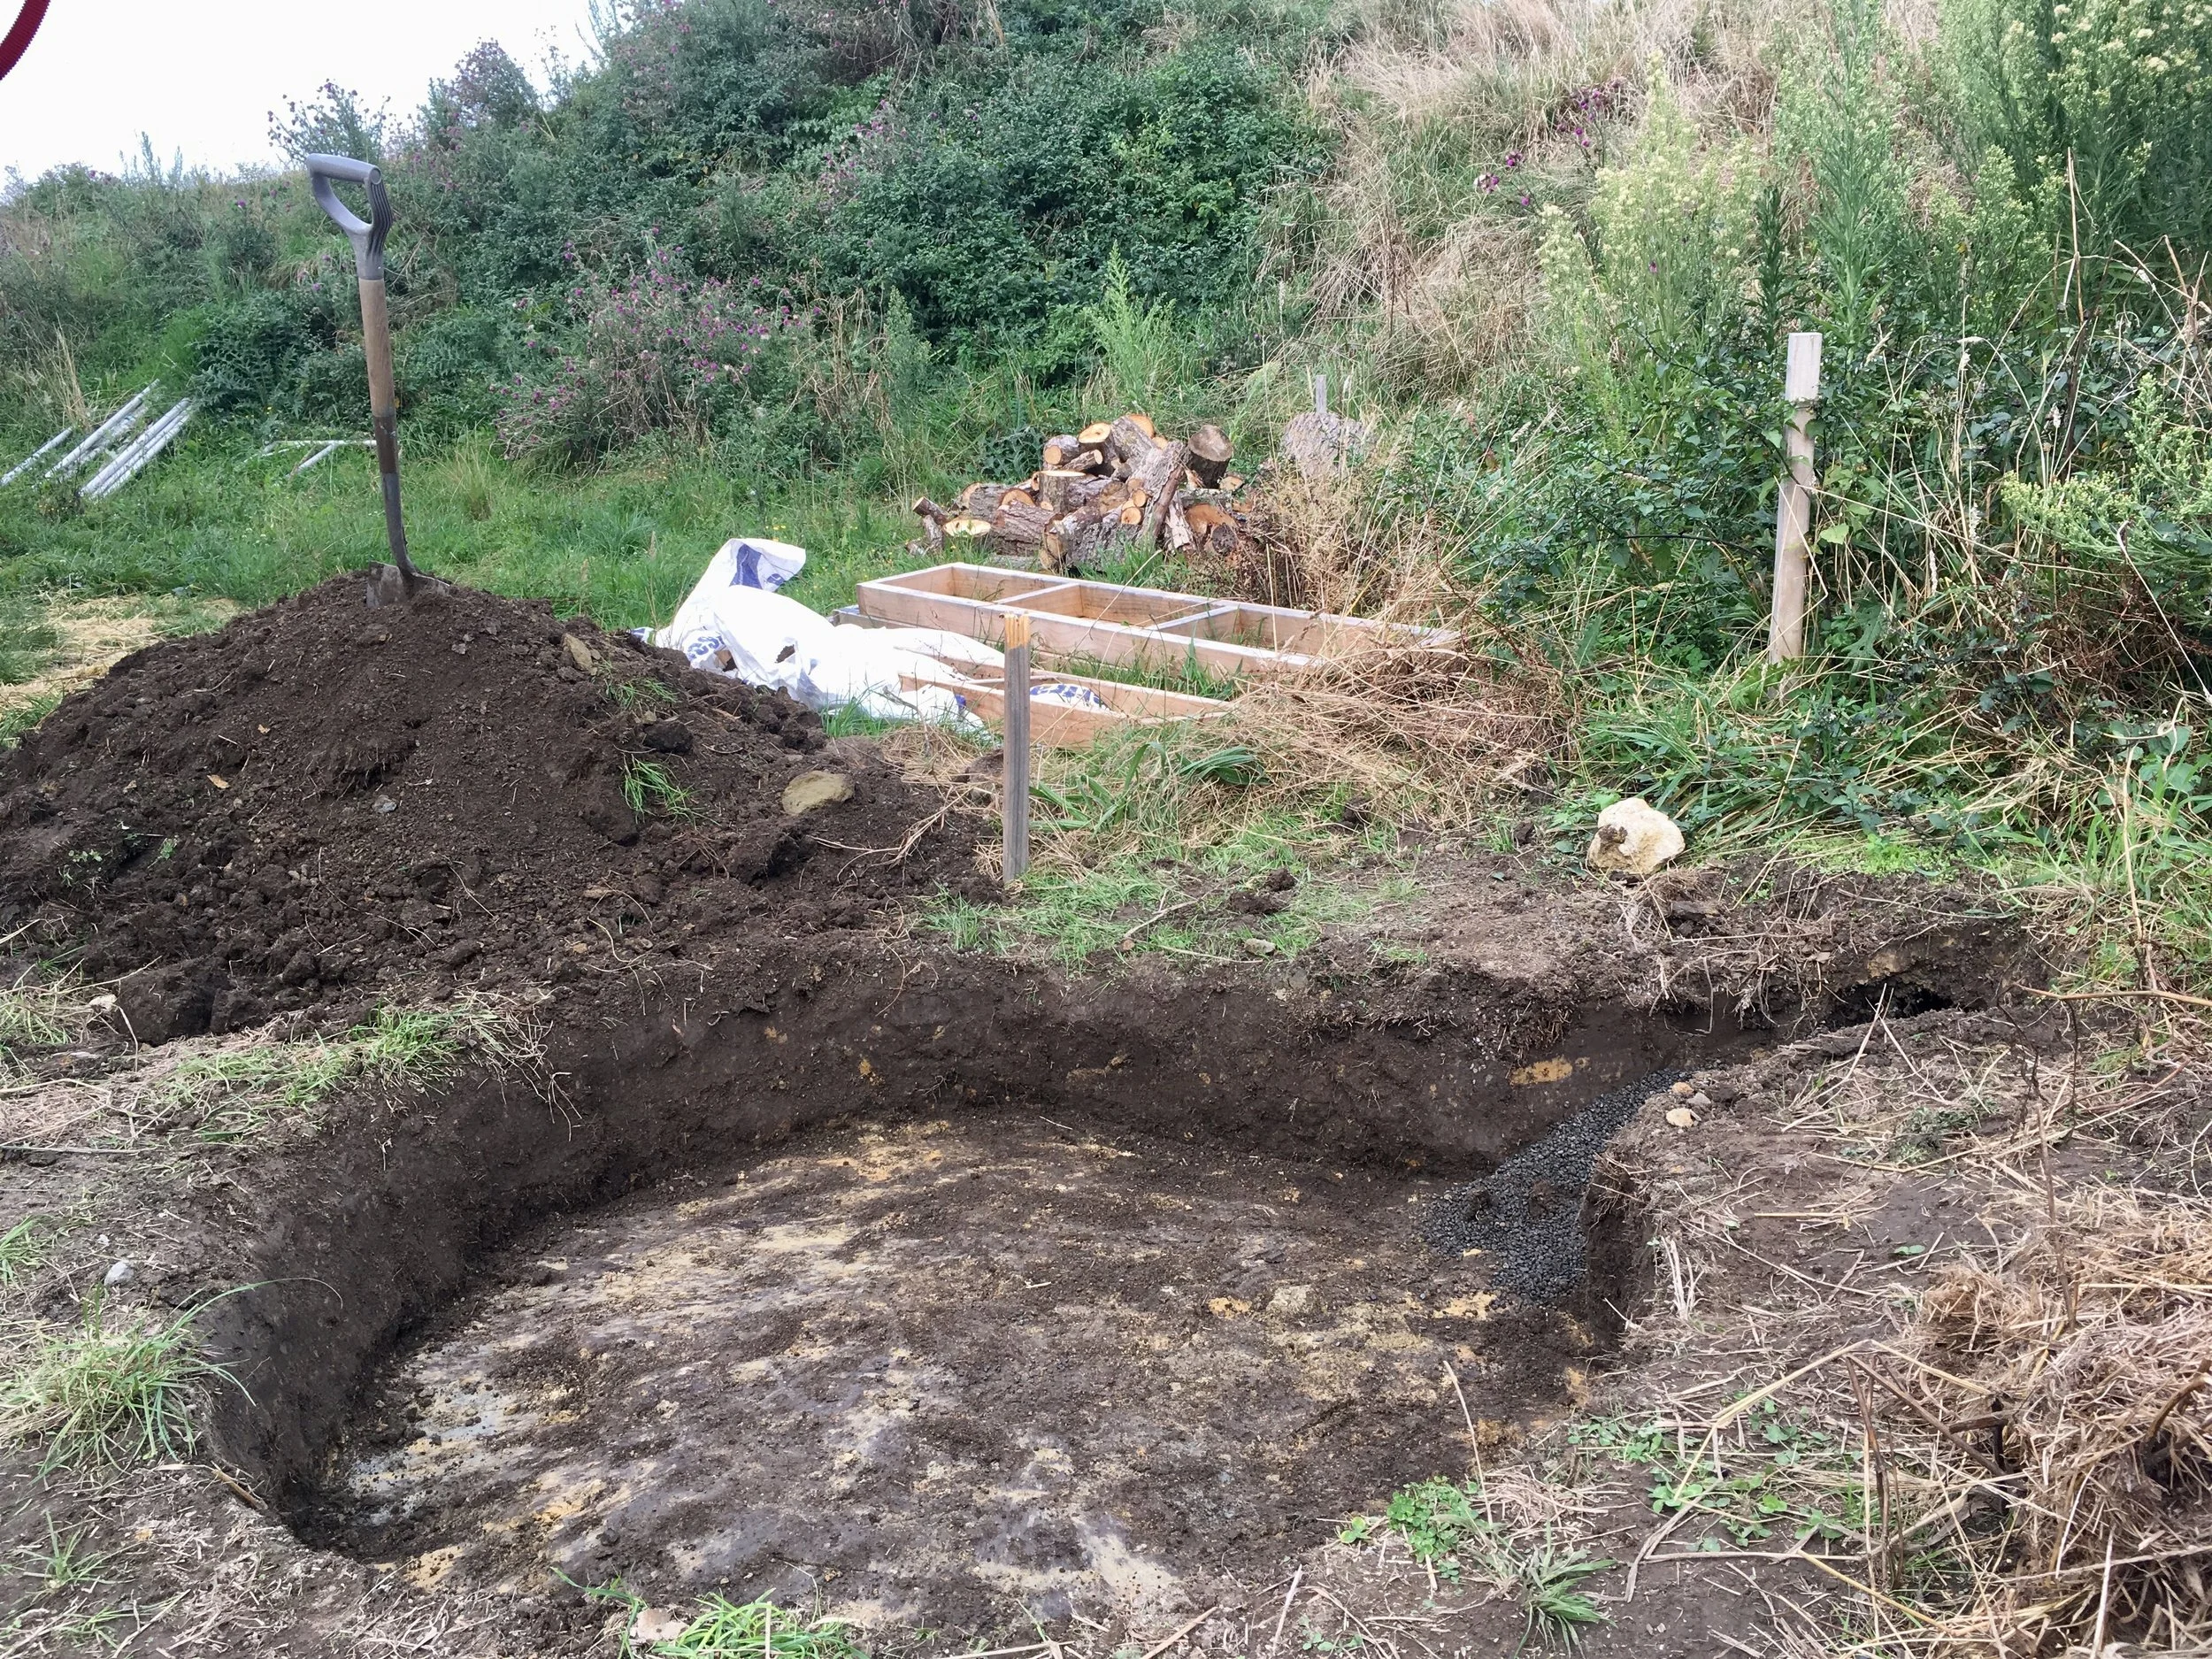
At Pat’s suggestion we used a pole to locate the center of the oven base, and a rope to mark off the circular area and stay on track as we dug, this worked really well.
I used a shovel to create a pile of top soil to one side and a round hole, with vertical sides, that takes us down to the hard, a clay/silt pan in our case.
Next we needed to fill our new foundation hole with something that won’t compress, subside or rot… so we used Facebook marketplace to find some fill. We found some river stones that had been used for landscaping and needed a new home, a drive into town with a trailer and back again, and some sweat shovelling the stones is all they cost.
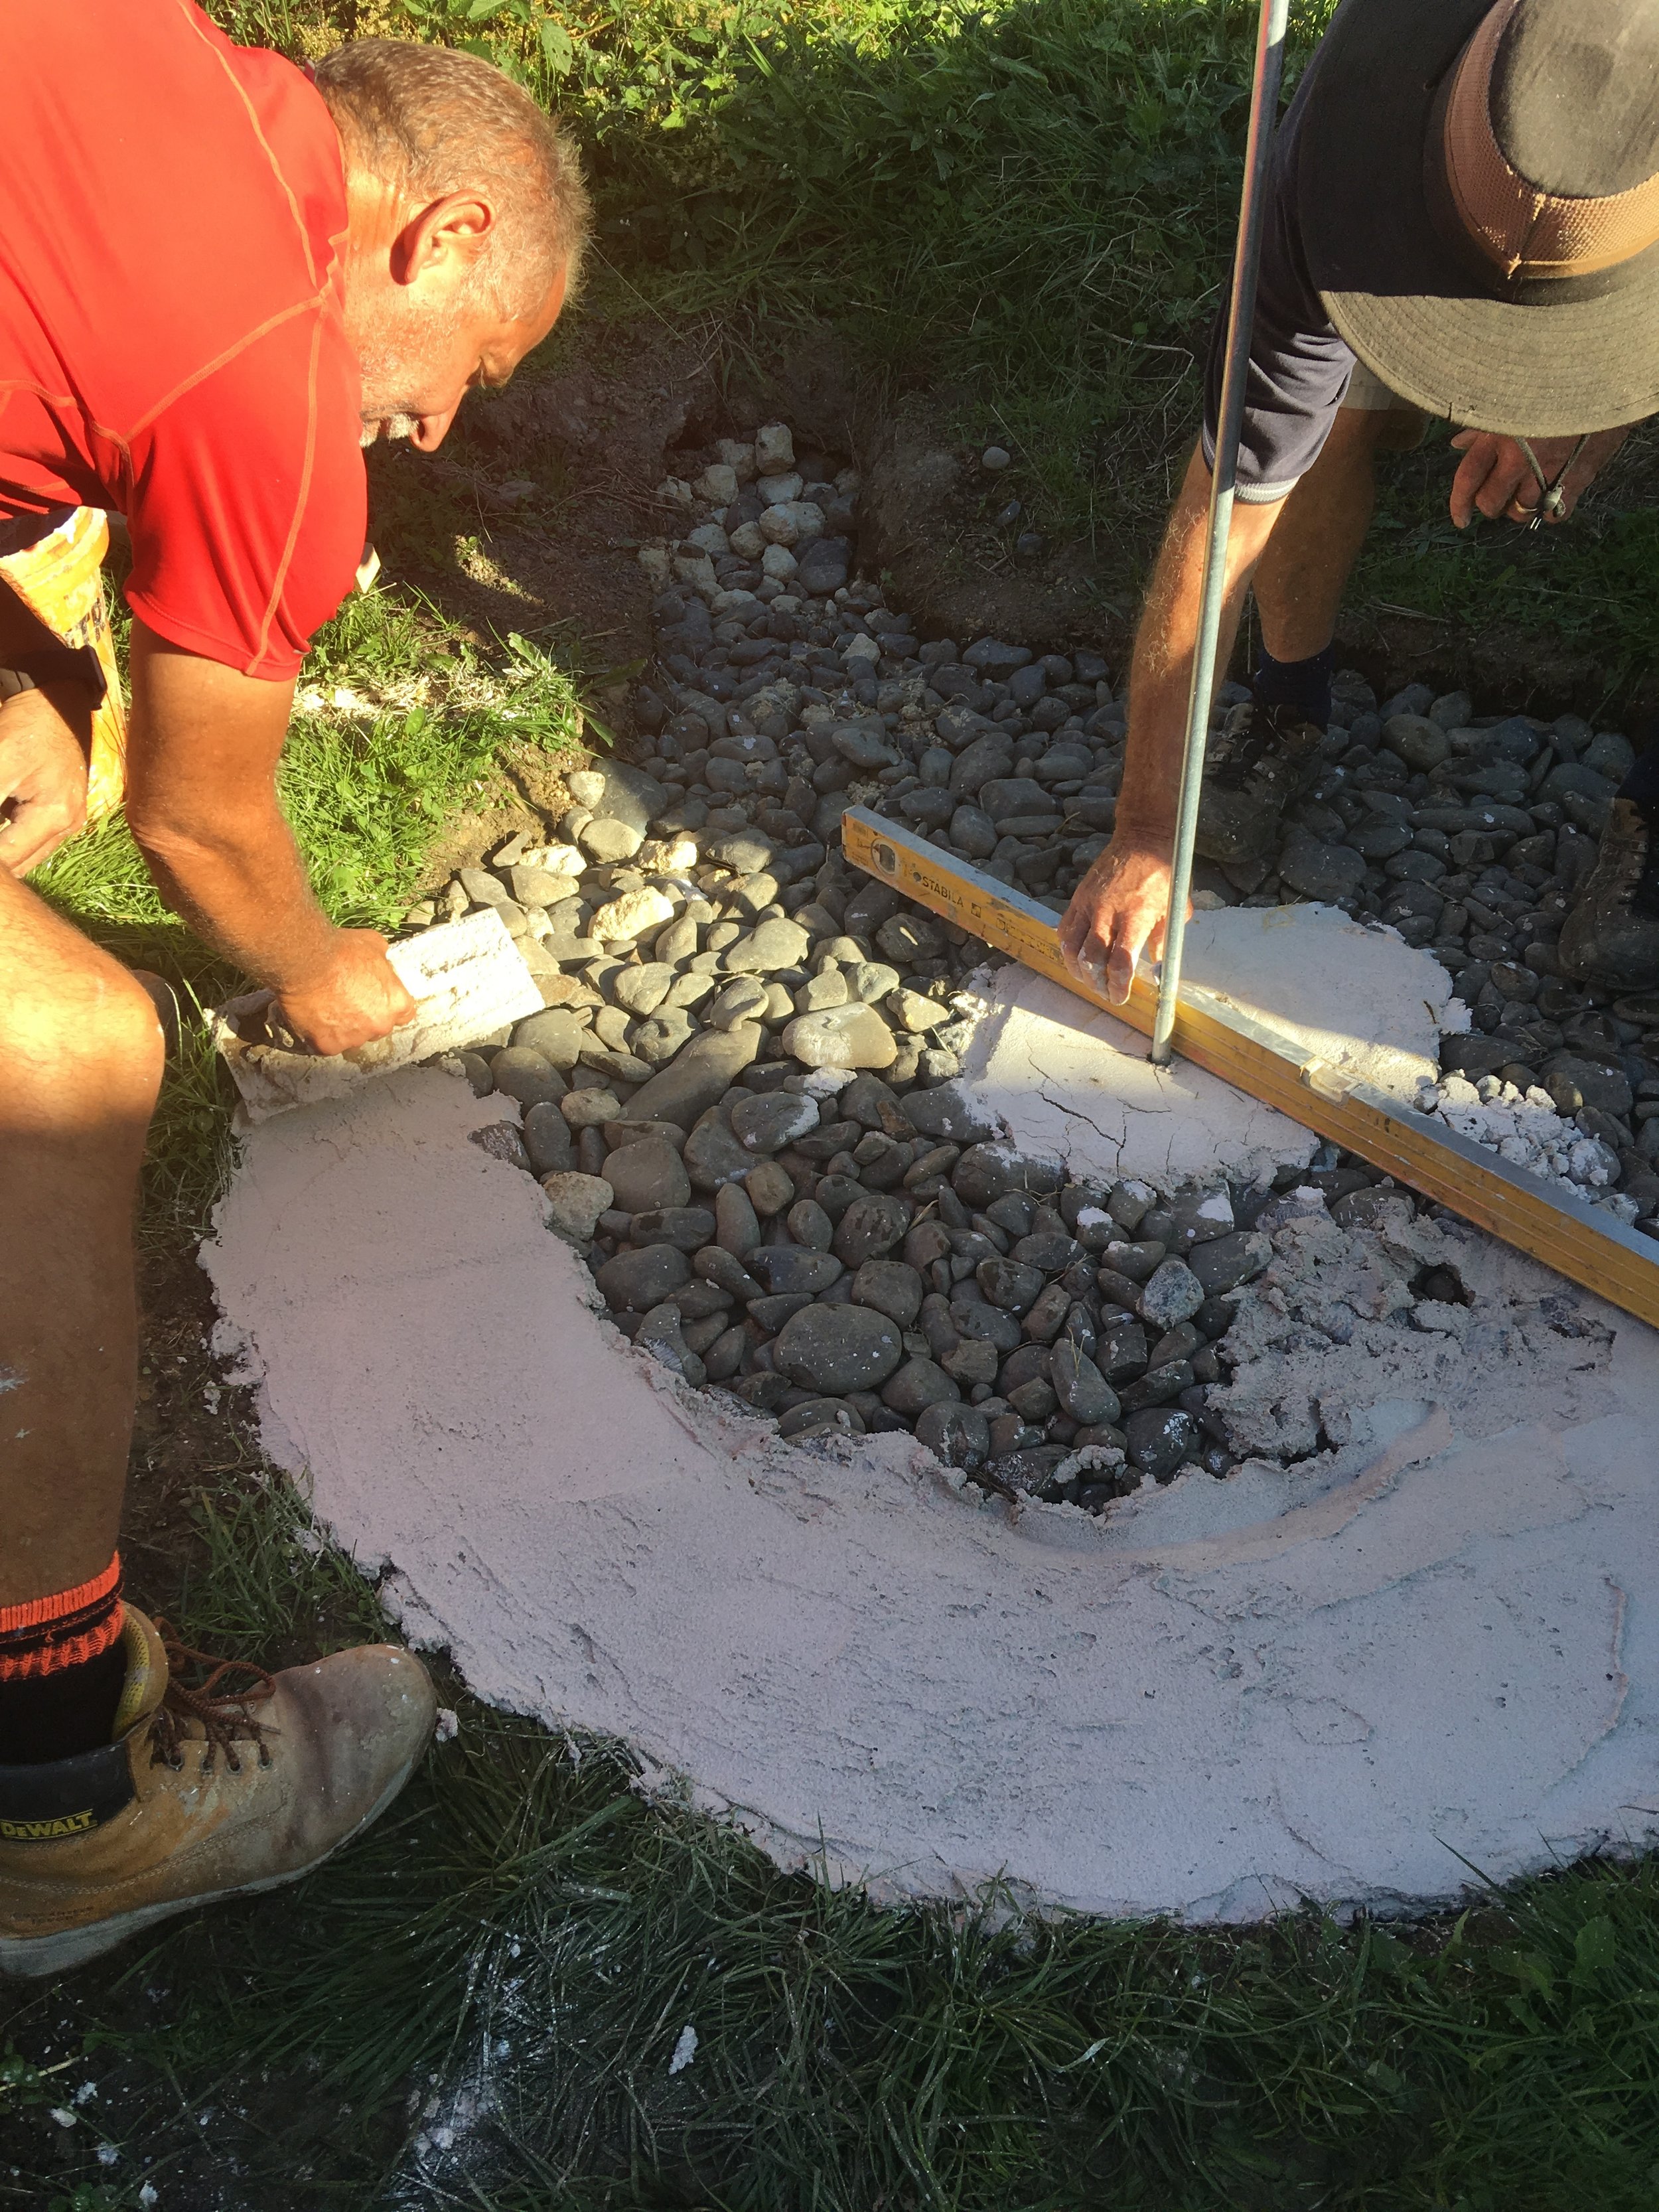
River stones are hard, but they are also rounded and don’t hold together so well. So I made a lime mortar ring where I was going to lay the oven base to bind them together.
We have a nova-flow drain, that catches stormwater from the hill behind our house, running right behind the location for the oven, so we joined up our foundation hole to the filled trench so any water collecting in our foundation area should drain easily through the pea metal covering the drain and away.. bonus :-)
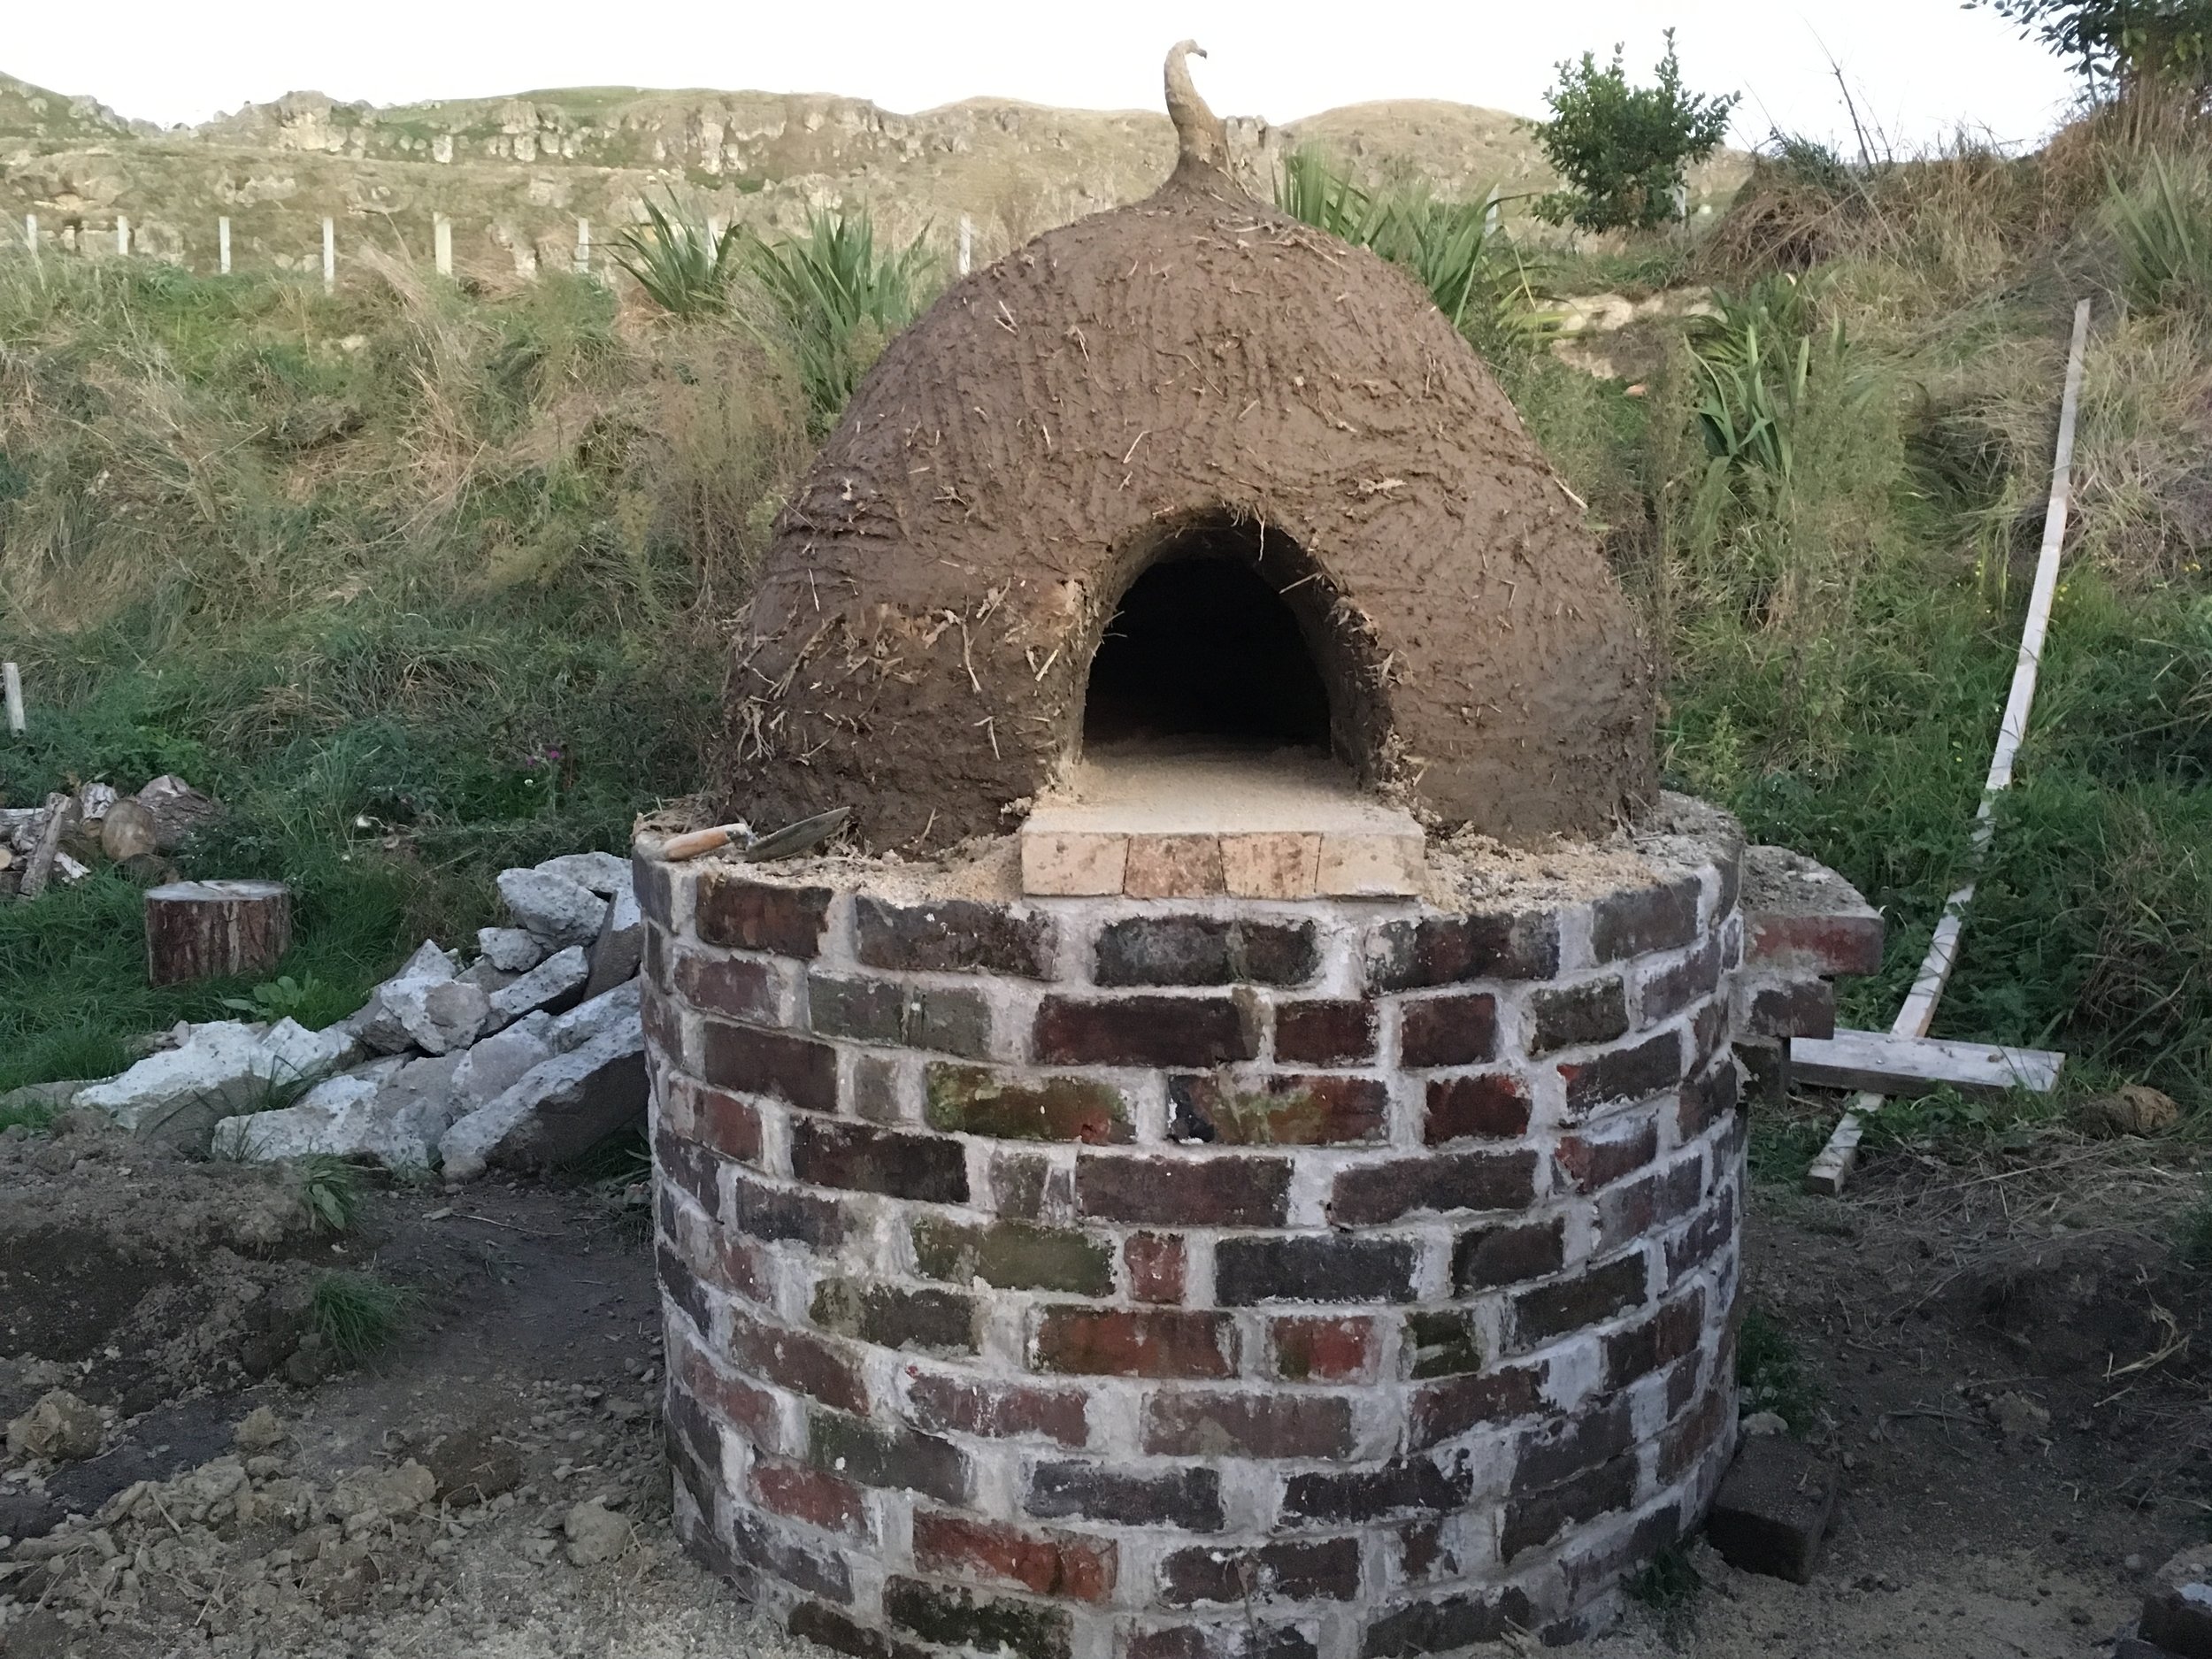
Step 4: Build the base
You may remember that way back in Blog 20 I told a reclaimed brick story.. well a few hundred of those bricks have found a new home in the outer shell of our Pizza oven base.

I started with a double brick plan but quickly realised that it would take a huge number of bricks and considerable time and effort to make a 900mm high base in double brick. I decided instead to have double brick columns strategically placed and interlocked to brace the wall, but time (and load) will tell if my decision was wise.
I mortared the bricks with lime mortar kindly supplied by Pat from a pallet load he had that was nearing its use by date.

Laying bricks in a circle is a bit of trick but after watching a Youtube video and winging it, I soon got into my stride, and using a combination of spirit level and by eye managed to lay up a wall that is pretty plumb and level.
We pointed the mortar using a teaspoon but we still left quite a lot of surplus lime on the bricks as added “character”.
Along the way several comments were made about the wishing well that had appeared in our backyard, and we can guarantee that any wishes for pizza will come true, at least for the patient amongst us.
The base also needed fill and it would need to interlock well and carry much of the load to compensate for my single brick wall…

Again, through the magic of Facebook marketplace, we managed to source some concrete rubble in town, and again a drive, trailer and sweat were all it cost us.
As we had a lot of free lime plaster on hand Pat suggested that I pour several batches of wet mortar down into the rubble fill to lock it and the base of the brick wall together - a great idea and it was done as soon as the base was loaded with rubble.

The final step to create the base was pouring several bags of pumice fill on top of the concrete rubble to level it off and create an insulation barrier between the base and the floor of the oven.
Base created!
Step 6: Lay the fire bricks
This step should really read get some fire bricks and lay them...
We looked around and got prices for new ones and after several searches final found that Hastings demolition had a stash of tapered firebricks that had been pulled out of a big commercial oven at a third of the price of new ones.
I dropped in to take a look and they were pretty clean and interlocked nicely so should create a nice pizza oven floor - so grabbed the lot and as luck would have it they had exactly the right number of bricks to make our pizza oven floor.
I next laid a thick layer of white limesand on the pumice inside our oven base to get things roughly level and then a final course of a few mm of black fine sand screeded off to a final level ready for fire brick laying.


Very important that the fire bricks are totally level, no mortar just placed tight against each other and tapped into place with a rubber mallet - we will be sliding our Pizza’s across this floor so humps and bumps would not be a good look.
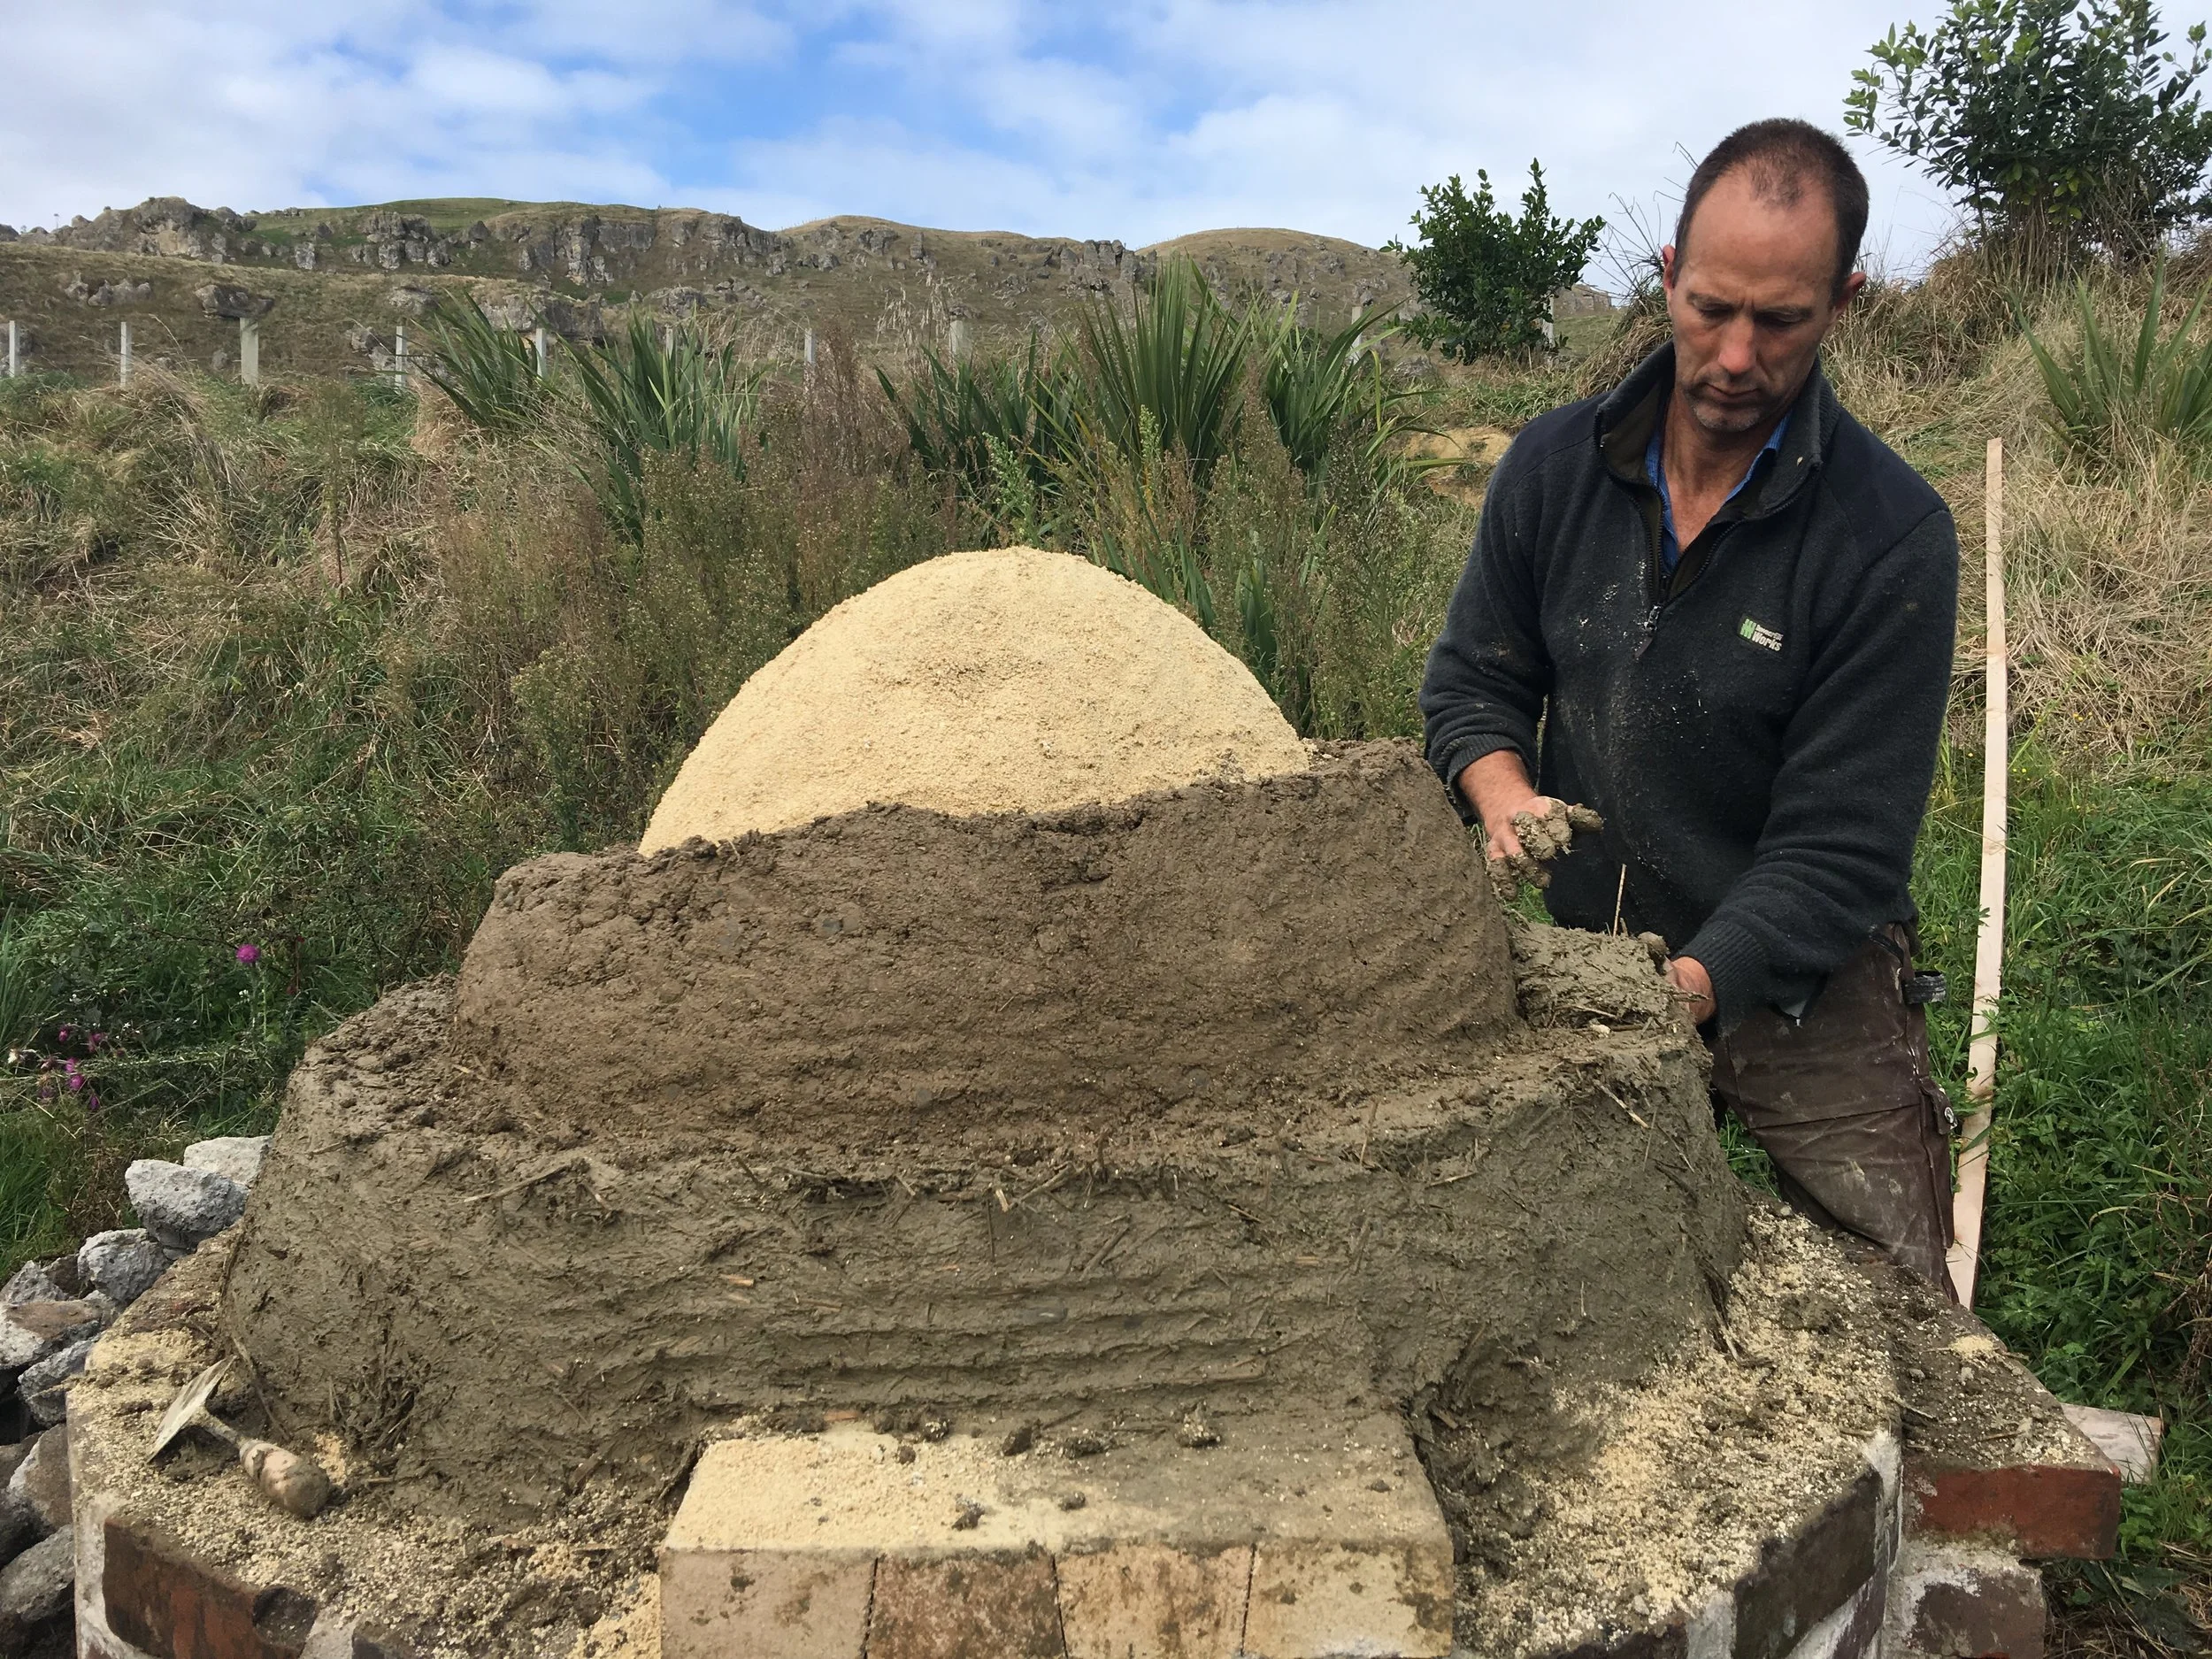
Step 7: Create the oven form
The shape of the firebox was created using damp limesand - a sand castle! we put another wooden stake at the center point that was cut to the desired height and laid up the sand.
When it was done we put wet newspaper on the sand so it would be easy to know, when hollowing the sand back out, that we had got to the edge of the sand form. That was the theory anyway, in reality the paper wouldn’t stay on in the breeze so we just let it go…


Step 8: Clay/sand firebox
We used a cement mixer to mix builders mix (could have been just sand) with clay and a little water - so nothing that can combust. It came out pretty dry and stiff and we laid it directly onto the sand form. In our second attempt we laid up the next layer, which includes straw, at the same time to help prevent later slumping - as you can see Pat demonstrating below, and this worked well.
Step 9: Clay/straw cob insulation
Next is a layer of straw and clay, a more classic cob plaster mix that has the added strength of fiber. This is laid up over the firebox in a thick layer.


Step 10: Cut the door and empty the sand
When the first couple of layers were in place we were ready to cut the door out with a trowel, before the firebox or clay/straw had time to get too hard. With the door opening cut to the required height (there is a ratio to oven internal height that is one of those important details in the book) it is then time to carefully scoop out the sand - on our second attempt we did this in a few seperate bursts over a couple of days to allow somer additional drying time and this helped - no slump, yet…


Step 11: Final exterior clay plaster coats
Finishing with a lime coat was an option, but it was likely to crack given the thermal ups and downs it would experience and would also limit what we could do artistically. Pat recommended we go with a clay plaster finish and take the opportunity for some artistic expression. So, clay plaster and art it is, and we will protect our cob pizza oven from the elements, when not in use, with a custom-built cover.
After opening up the oven, we added a layer that has minimal clay on the straw, just enough for it to be sticky, and this was applied as an insulation layer, and then over-coated with a layer of clay plaster layer that can have artistic elements built into it - like Pats fun cowlick below

Straw insulation layer and door mouth build-up.. it’s getting there
Step12: Fire it up
To start Alessandra is lighting small fires, getting bigger each day to aid in drying out the oven, gradually… There is a lot of water in the cob plaster mix and the goal is to shed this without major cracking of the oven - so far so good!


We have a couple more steps to go at time of writing, which will be covered with pictures in Pizza Oven Blog #2, including artistic expression… and firing it up fully and eating our pizza fresh from the oven for the first time.
We will also cover a step by step for the outside bathroom as another blog update when we get to it later in the build.